Attention: Our phone systems are currently down. We apologize for any inconvenience this may cause.
DTF transfer placement guide graphic

Mastering Heat Transfer Placement

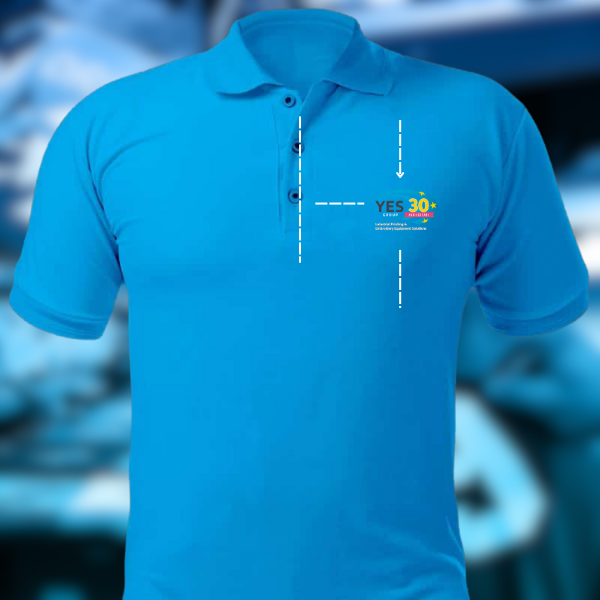
When it comes to printing custom apparel, the placement of your DTF (Direct to Film) transfers is just as important as the quality of the print itself. Misplaced designs can make even the best graphics look unprofessional, while perfectly positioned transfers elevate the final product and enhance customer satisfaction.

Whether you’re decorating T-shirts, hoodies, polos, or even workwear, knowing where to place your designs ensures a polished, retail-ready look. In this guide, we’ll walk you through standard heat transfer placement for a variety of garments, helping you get consistent, professional results every time.

DTF Transfer Placement Guide

Perfect Placement for Heat Transfers or Cut Vinyl Transfers

Full- Front T-Shirt Placement

This is the most common placement for heat transfers.  The heat transfer is centered in the chest area following the “two-fingers” rule (about 1” down from the collar)

Suggested Sizes:

Adult: 8” to 12” Wide

Youth: 6” to 9.5” Wide

Center-Chest T-Shirt Placement

Center-Chest design placement is used for half-height logos or designs.  Center the design in the upper chest area.  If the design is too low, it can end up in the breast or stomach area for some women. 

Adjust the placement if necessary, for each size and cut of shirt.

Suggested Sizes:

Adult: 5” to 12”  [127mm  to  304.8mm] wide depending on logo

Youth: 4” to 9.5” [101.6mm to 241.3mm] wide

Infant: 2” to 6” [50.8mm 152.4mm] wide

DTF Transfer Placement Guide

Left / Right Chest Heat Transfer Placement (Polo Shirt)

3.53Most logos are left chest aligned allowing for a name, or a name patch to be placed on the right of the persons chest.  

The inside edge of the collar is used as a vertical center line for aligning the logo or design.  The bottom of the logo is typically no lower than the bottom of the placket of the polo.

Suggested Sizes:

Adult: 3.25” to 5” [89.4mm to 127mm] wide depending on logo height. 

Youth: same

Infant: not applicable

Left / Right Chest Heat Transfer Placement (T-Shirt)

Left-Chest heat transfer or cut vinyl placement on t-shirts is similar to the way the design is placed on a polo shirt.  Except that there is no buttons or placket to be able to determine how far down the logo should go. 

Be careful not to let the logo get too far to the left (as if wearing the shirt) as it may end up in the armpit area.  And be careful that the design is not too low that it covers the breast area.  Adjust accordingly for scoop neck t-shirts.

Suggested Sizes:

Adult: 3.25” to 5” [89.4mm to 127mm] wide depending on logo height.

Youth: same

Infant: not applicable

DTF Transfer Placement Guide

Left / Right Chest Heat Transfer Placement (Youth Polo Shirt)

Left-Chest placement on youth polos is tricky at best.  The relative size of the logo or design compared to the space means it’s easy to get the logo too far into the armpit area.  Use the collar as a centerline, however, don’t be afraid to let the logo get very close to the placket.

Suggested Sizes:

Adult: 3.25” to 5” [89.4mm to 127mm] wide depending on logo height.

Youth: same

Infant: not applicable

Left / Right Thigh Placement (Shorts or Pants)

Left or Right thigh placements will vary depending on the shape of the logo.  Tall logos will be as show above.  

The logo should remain be aligned vertically or horizontally so that it can be read straight up and down.   You don’t want the logo to follow either pant-line unless the pant-line is also vertical.  For shorts, you’ll align the logo horizontally above the bottom of the cuff.

Note: This placement is also good for the sides of pants and shorts.

Suggested Sizes:

Adult: 1” to 3” [ 25.4mm to 76.2mm]  wide by 8” to 10” [ 203.2mm to 254mm] tall (if tall design)

Adult: 2” to 5” wide [50.8mm to 127mm](if wide design)

Youth: .75” to 2” wide by 8” to 10” tall (if tall design)

Youth: 2” to 5” wide [19.05mm to 127mm](if wide design)

Infant: not applicable

Logo placement on jeans or pants
Long sleeve shirt DTF transfer placement

Left / Right Front Arm Placement (Long Sleeves)

Left or right front arm placement is ultimately a decision you should talk out first with the customer to make sure you understand what they want.  

Most logos or designs are long and thin and consist of letters or a combo of letters with a mascot.  Unlike a pant let placement, your alignment will be perpendicular with the sleeve of the shirt.  Popular placements are as show above, or on the left or right side of the sleeve.

Suggested Sizes:

Adult: 1” to 3” wide by 6” to 8” tall

Youth: .75” to 2” wide by 6” to 8” tall

Infant: not applicable


Left / Right Side Arm Placement (Short Sleeves)

Left or right front arm placement for short sleeves is straightforward.  You can flatten out the sleeves and center the design on the sleeve area. 

If the design is wide, you will want to make sure it is aligned horizontally to the cuff. 

Suggested Sizes:

Adult: 1” to 3” [25.4mm to 76.2mm] wide by 2” to 4” [50.8mm to 101.6mm] tall

Youth: 1” to 3” [25.4mm to 76.2mm] wide by 2” to 4” [50.8mm to 101.6mm] tall

Infant: 1.5” by 1.5” [38.1mm x 38.1mm] max.

Left and right sleeve t-shirt transfer placement
DTF Transfer Placement Guide

Center Chest on Hoodie (With or Without Pockets)


Center chest placement on a hoodie is like center chest for a t-shirt placement except that you need to allow more room at the top (only applies to hoodies that don’t have a zipper). Imagine a centerline from the lower neckline extending down centering the space.  Place the top of the design as much as 3-3.5” from the collar area.

Suggested Sizes:

Adult: 8” to 12” [203.2mm to 304.8mm] wide

Youth: 6” to 9.5” [154.2mm to 241.3mm] wide


At YES Group, we supply businesses across the UK with industry-leading DTF printers, transfer printers, and supplies, so we know how important accuracy and efficiency are in your workflow. Use this quick reference to ensure your designs always hit the mark